Engage allows you to assign specific items to other team members and co-workers in your company, allowing for a collaborative workflow and ensuring the right message gets to your audience.
In this article, you’ll find out more about how to assign, unassign and view assignments in Engage.
In this article:
What Type of Content Can I Assign in Engage?
In Engage, it’s possible to assign the following items:
- An entire conversation (e.g., a post, DM thread, mention, or review).
- An individual comment in a conversation.
- An individual DM reply.
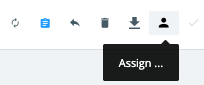
Once you've opened any conversation in Engage, look for the Assign icon. It can be found in the top, right-hand side of each conversation or by hovering over each individual DM reply or comment.
Note:
Comments can be assigned, though it’s not possible to assign any comment replies (nested comments).
Who Can I Assign Content to in Engage?
When you’re assigning content in Engage, there are 4 possible options:
- Any Social Media Management user in your team(s).
- An entire team.
- An email address.
- A connected Zendesk account.
If you’re assigning an entire conversation, you can choose from any one of the above options. However, individual comments and individual DM replies can only be assigned to a Social Media Management user or a team.
Please see below in this article for more information on how to assign content to each recipient.
Assigning Engage Content to a User or a Team
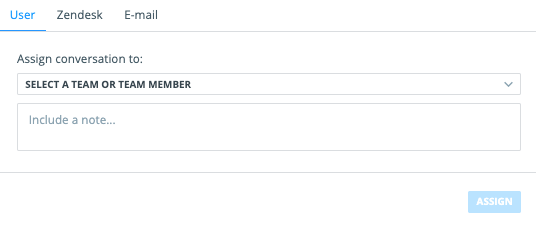
To get started assigning content to a user or a team, please follow the steps below:
- Click to open any conversation in Engage.
- Click the Assign icon found in the top right-hand side of the post or by hovering over a comment.
- Under Assign message to, use the dropdown to choose a team or team member.
- Include a note if applicable.
- Click Assign.
The selected Social Media Management user will receive an email notification. If you select a team, each user in that team will receive an email. The email will contain the name of the user who assigned the content, the channel, the network, the date and time the content was assigned, and a link to the post in Engage.
Assigning Engage Content to an Email Address
It’s only possible to assign an entire thread to an email address. This means you can assign a post which may contain numerous comments, or a DM thread which may contain several replies, but it's not possible to assign each comment or reply to an email address individually.
You can assign a conversation to any email address, whether the email address belongs to a Social Media Management user or not. Please follow the steps below:
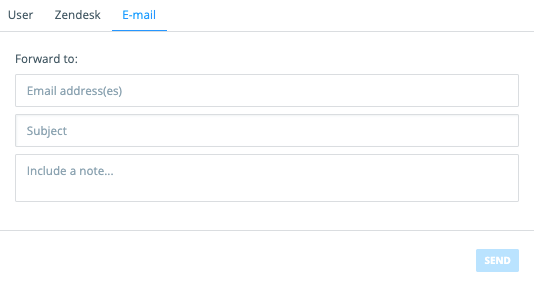
- Click to open any conversation in Engage.
- Click the Assign icon in the top, right-hand side of the conversation.
- Click E-mail below the post preview.
- Enter the recipient email address followed by a subject and a note (Note: Email address and subject are required).
- Click Send.
The recipient will receive an email from notifier@falcon.io with the subject entered at point 4 above. The email will contain the name of the assigner, a preview of the conversation, a link to view the post in Social Media Management, and a link to reply to the assigner.
If the recipient clicks Reply to Assigner, this will begin a new email draft to the email address of the assigner in Social Media Management.
Note:
In the email, the View in Social Media Management option will only successfully lead the recipient to the conversation in Social Media Management if they are a Social Media Management user and currently logged in.
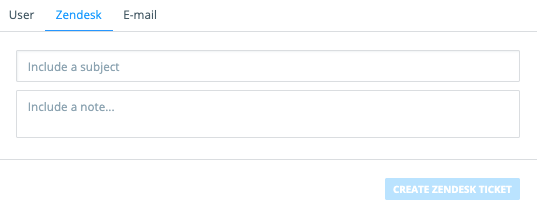
Assigning Engage Content to a Zendesk Account
Currently, it’s only possible to assign an entire thread (e.g., a post or a DM thread) to a Zendesk account. Individual replies and comments can only be assigned to a user or a team.
In order to assign Engage content to a Zendesk account, please make sure that you have a Zendesk account connected to Social Media Management. Please visit our Help Center guide for more information here. Once you’re set up, follow the steps below:
- Click to open any conversation in Engage.
- Click the Assign icon in the top, right-hand side of the conversation.
- Click Zendesk.
- Enter the subject and a note (Note: All fields are required).
- Click Create Zendesk Ticket.
In your Zendesk account, you will receive a new, unopened ticket. The ticket requester will be listed as the email address of the user who connected the Zendesk account to Social Media Management. The subject will appear as entered in step 4 above.
The body of the new ticket will contain the applicable Channel name, the name of the assigner, a link to the content in Social Media Management, the note left by the assigner, and a disclaimer that the ticket originated in Social Media Management.
Viewing Assigned Messages in Engage
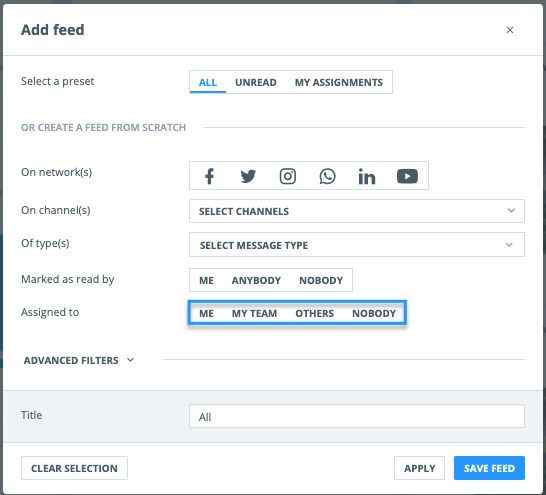
In Engage, you can create a new feed to view messages which were assigned to you, assigned to your team, assigned to anyone else, or unassigned. Please see the steps below to set up your feed:
- In Engage, click Add Feed from the top right.
- Select networks, channels, message types, or read status (if applicable).
- In the Assigned to field, choose between Me, My Team, Others, or Nobody.
- Click Save Feed.
Tip:
Alternatively, you can click My Assignments from the Select a preset field shown in the screenshot above. With this preset, you’ll see content assigned to you and your team.
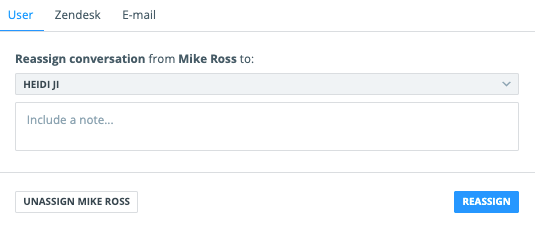
Unassigning and Reassigning in Engage
Whether an item has already been assigned to you or another user, it can be unassigned at any time. On the assigned item, click the highlighted Assign icon. Next, either select Unassign... or Reassign.