
Planning your brand’s social media messaging for a few days or weeks ahead can be a great way to save time when you have a busy campaign coming up.
Within Publish, you can import multiple messages and specify a date and time for each to be published, using a CSV file. The CSV (comma-separated values) file can be created in a number of different tools, such as Google Sheets or Excel.
Note:
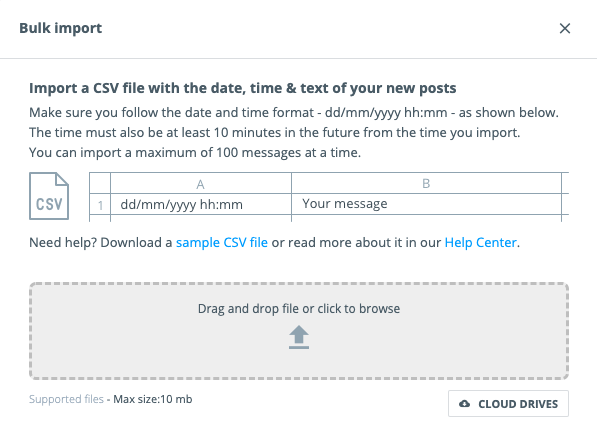
The maximum number of messages that can be uploaded at once is 100, and the file size cannot exceed 10 MB. Furthermore, only text and URLs can be added to posts; it's not possible to import images or videos.
Bulk Importing Posts From a CSV File
- Within your CSV file editor of choice, create a new file with two columns, and no column headers.
- In the first column, enter the scheduling date and time in the exact format: dd/mm/yyyy hh:mm (e.g. 21/03/2022 23:45).
-
In the second column, enter the text and any URLs you would like to add to the post. Each row is treated as a separate post.
Note:
If you include a URL for a post, it will create a link post with a link preview card, if the chosen network supports it. The link will still remain a part of the post text too.
- Save the file in the .csv format.
-
In the Calendar within the Social Media Management Publish module, select Import from the actions menu in the top right.

-
Upload your CSV file by clicking the file area to open a local file browser, clicking the Cloud Drives button, or by dragging the file to the file area.
-
In the next section, select one or more Channels to schedule to and add any labels that you want to apply to the content.
Note:
You can schedule content across multiple Channels and Networks. Instagram cannot be scheduled to since it requires a media object (image or video) to create a post. We recommend using the Content Pool to bulk import media files into Social Media Management.
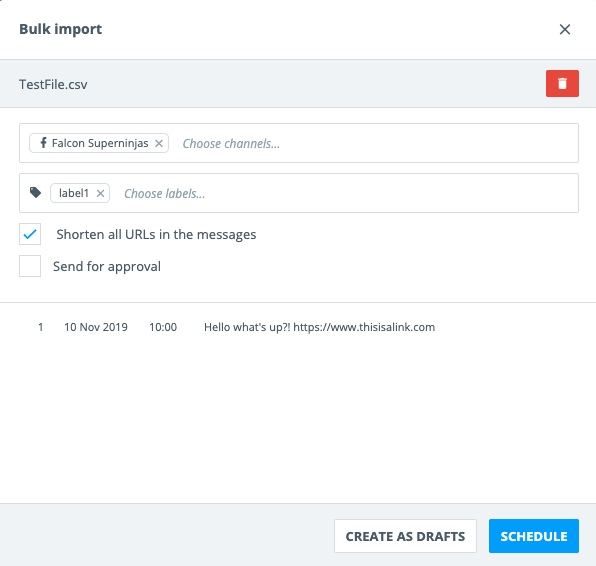
- Choose whether or not to shorten all URLs in the posts (Click here to read more about the Social Media Management link shortener).
- Choose whether or not the posts needs to be sent for Approval. If so, select Send for Approval and choose the approver from the dropdown list.
- Finally, select either Create as Drafts or Schedule.